How do I set up my Airport Extreme for Servus?
Overview
We’ve tested wireless routers from most major vendors (Cisco/Linksys, D-Link, Netgear, etc.) and the most reliable one we’ve found is Apple’s Airport Extreme. It’s a bit more expensive than its competition, but the adage of “you get what you pay for” appears to be in effect here.
These are not intended to be comprehensive instructions for setting up the Airport Extreme hardware itself. There is excellent documentation on Apple’s site and the Airport Extreme Manual is very thorough. This article will simply run through how we recommend configuring an Airport Extreme for use by the Servus system.
Configuration
1. Run the Airport Utility
Once you have your Airport Extreme plugged in, you will need to run the Airport Utility on your Mac or Windows PC. The application will appear as shown below:
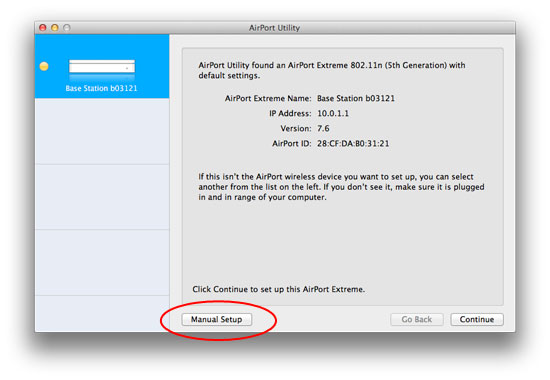
Notice the “Base Station b03121″ in the left column — that is the out-of-the-box, unconfigured base station. If the utility isn’t able to find a base station, make sure your wireless is turned on and click the “Rescan” button.
Make sure your base station is highlighted in the left column (by clicking on it) and click the “Manual Setup” button as shown in the screenshot above.
2. Setting Base Station options
The screen should look as follows:
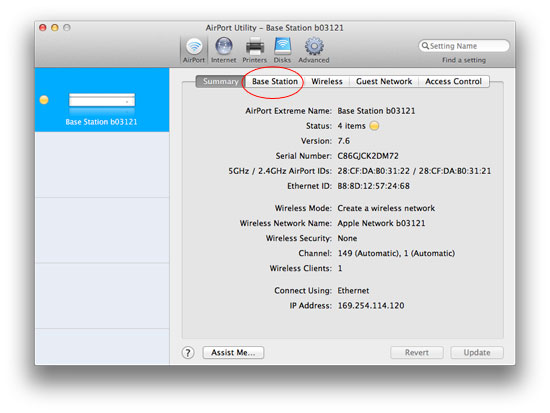
Click the “Base Station” tab as shown above. You will then see the following:
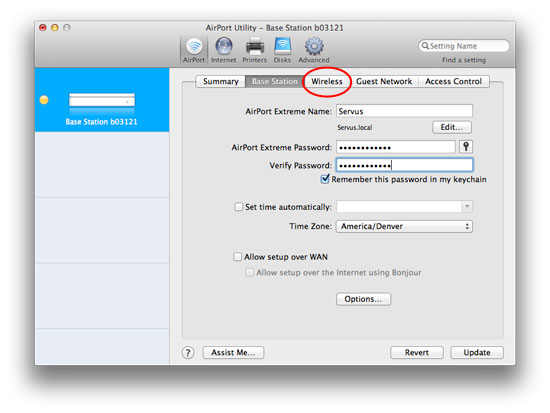
Change all settings to match the screenshot above. You can set the password to anything you want. Note that this is the password for administering the router and not for accessing the wireless network. When finished, click the “Wireless” tab as shown above.
3. Setting Wireless options
You should see the following:
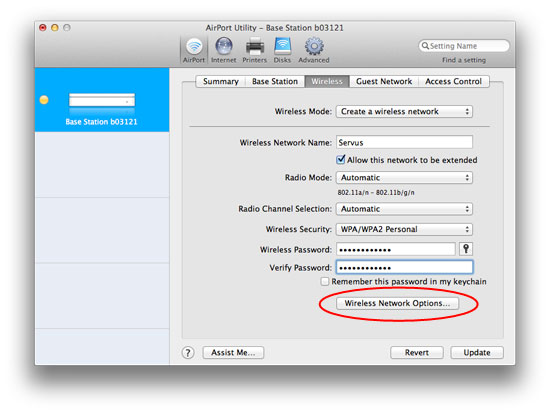
Again, fill out the information as shown in the screenshot above. The password can be anything you want. Note that this is the password that will be entered on the Servus devices to access the network. We recommend making this different than the password set in step 2.
When finished, click the “Wireless Network Options…” button as show above. A box will appear as show below:

Make sure the “Create a closed network” is checked as shown above. This will prevent the Servus network from being advertised and makes it even more secure. When finished, click the “Done” button.
4. Configuring DHCP
Click the “Internet” toolbar item (1) and then the “DHCP” tab (2) as show below:
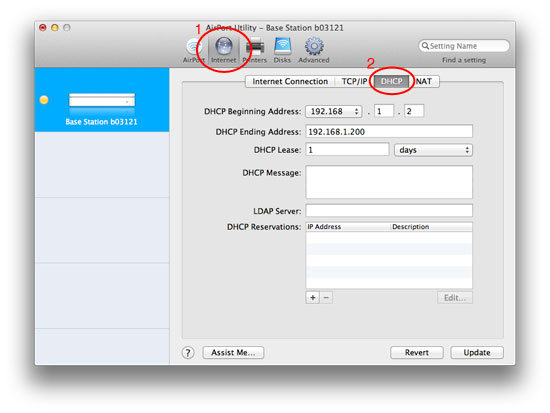
Change the “DHCP Beginning Address” to “192.168″ as shown above. The rest of the items should automatically change to match the screenshot. Then click the “Update” button in the bottom-right. This will cause the Airport Extreme to reboot.
When the reboot is complete, your wireless network will be ready for use by Servus.
5. Turning off warnings (optional)
Since your Airport Extreme isn’t on the Internet, a yellow LED on the front of the device will continuously blink indicating a warning. This can be turned off if it is bothersome.
Run the Airport Utility and it should look as follows:
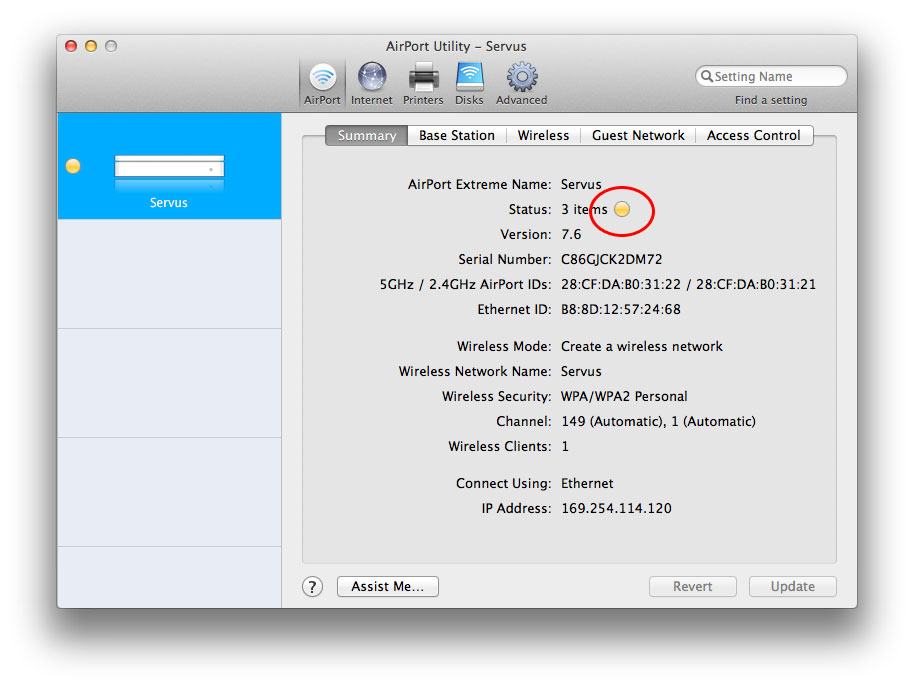
Note: If the utility can’t find your Airport Extreme, it may be because you have not joined the Servus network. Make sure the wireless is activated on your Mac/PC and that it has joined the Servus network. Then click the “Rescan” button.
Make sure the “Servus” item is highlighted in the left column and then click the yellow button as shown in the screenshot above. The screen will change as shown below:

Click the checkboxes for all three items and then click the “Update” button as shown above. After a few seconds, the LED on the front of the Airport Extreme will glow a steady green.
