How do I connect my pager system to Servus?
Overview
Servus can communicate with external pager systems using the PagerLink device. The two steps necessary are connecting the PagerLink hardware and configuring the Servus software with the specifics of your pager system.
Connecting PagerLink

Step A: PagerLink to tablet
Connect one (and only one) tablet to the PagerLink device using the USB cable that was provided with your tablet. Note that this will be the same as the charging and/or sync cable depending on your tablet model.
Step B: PagerLink to paging system
Connect the PagerLink device to your pager system controller using the serial cable included with PagerLink. If you chose not to order a cable when you purchased your PagerLink device, you will need to supply your own as indicated below:
- HME GuestCall®: DB-9 male to DB-9 male null modem.
- JTECH Guest Alert: DB-9 male to DB-9 male null modem.
- Microframe Vibrating Pager & Visual-Pager® (with Xlite controller): DB-9 male to DB-25 female straight-through.
Once all cables are correctly connected, you can move onto the next step.
Configuring Servus
Servus must be configured with the specifics of your pager system. This is done in the Servus PagerLink preferences.
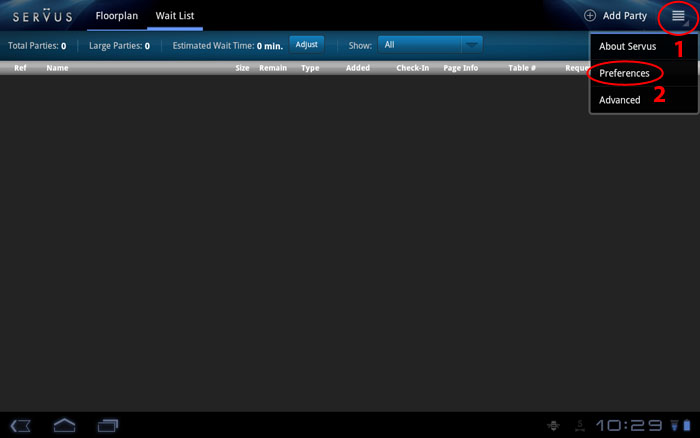
1. From within the running Servus application, tap the menu button in the upper-right corner (1) then tap the “Preferences” item (2) that appears as shown below:
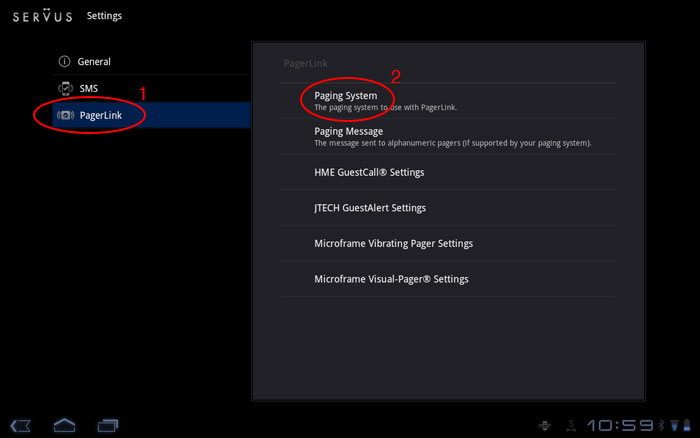
2. Tap the “PagerLink” item in the left column (1) then tap the “Paging System” item that appears in the right column (2) as shown below:
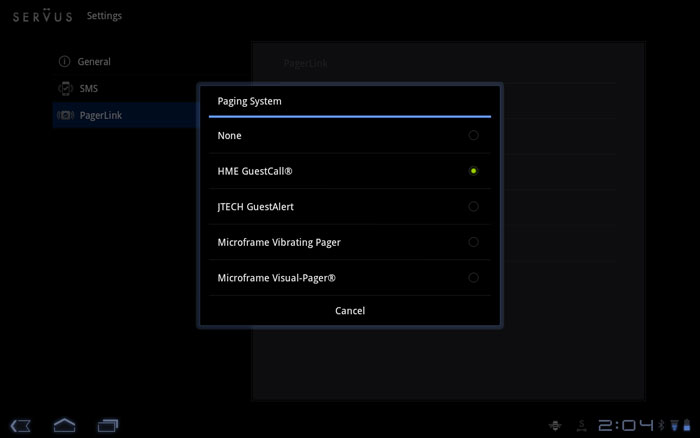
3. A dialog appears with a list of all supported pager systems as shown below. Tap the appropriate pager system:
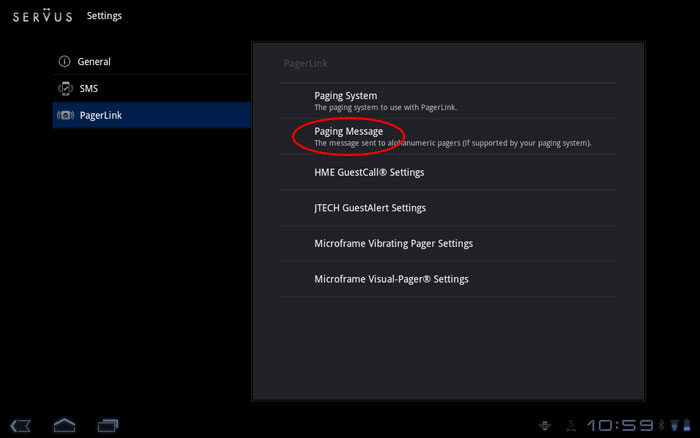
4. The default message sent to alphanumeric pagers is “Your table is ready.” If you wish to customize this message, tap the “Pager Message” item:
5. You can then enter your custom message as shown below. The party name is always prepended to the message with a dash. For example: “John-Your table is ready.”
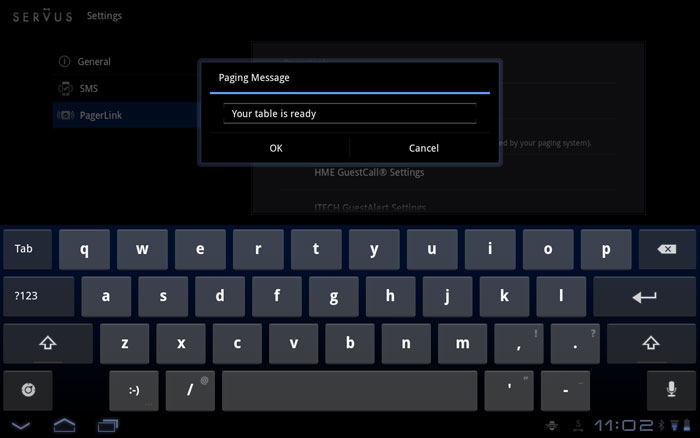
The next steps will be specific to the pager system you selected in step 3 above: HME GuestCall®, JTECH GuestAlert, Microframe Vibrating Pager or Microframe Visual-Pager®.
HME GuestCall®
If you are using an HME GuestCall® system, you will need to enter the Base ID provided to you by HME. This ID is displayed on the LCD screen of the GuestCall® controller when it is first turned on.
1. Tap the “HME GuestCall® Settings” item as shown below:
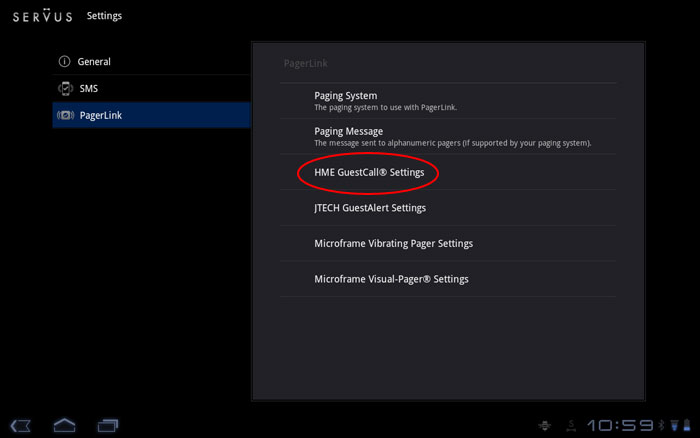
2. Tap the “Base ID” item that appears as shown below:
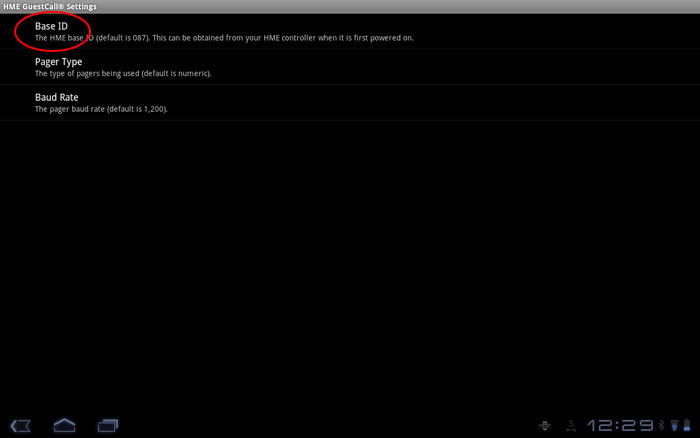
3. Enter your Base ID into the dialog that appears and then tap the “OK” button as shown below:
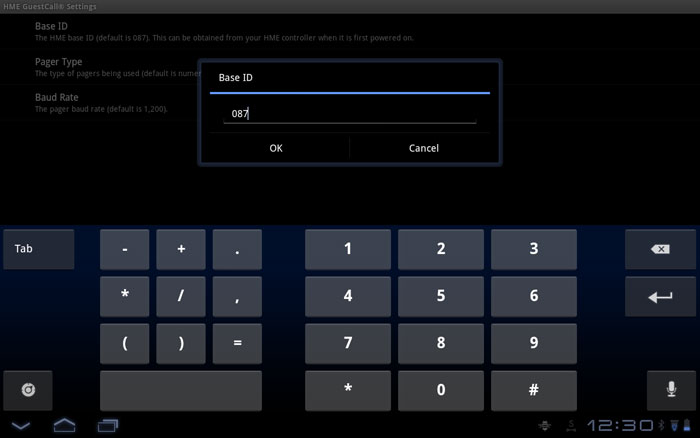
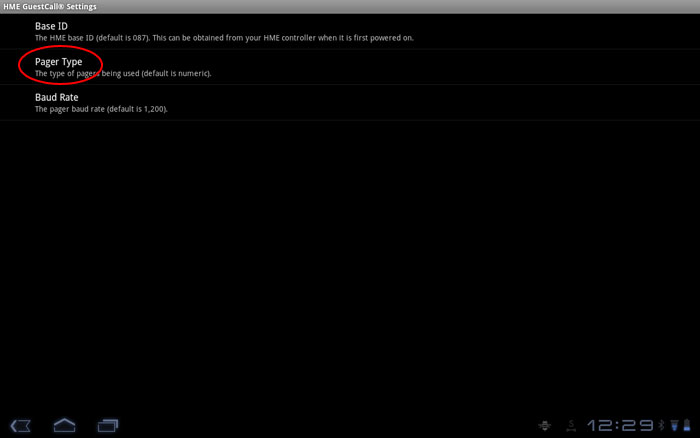
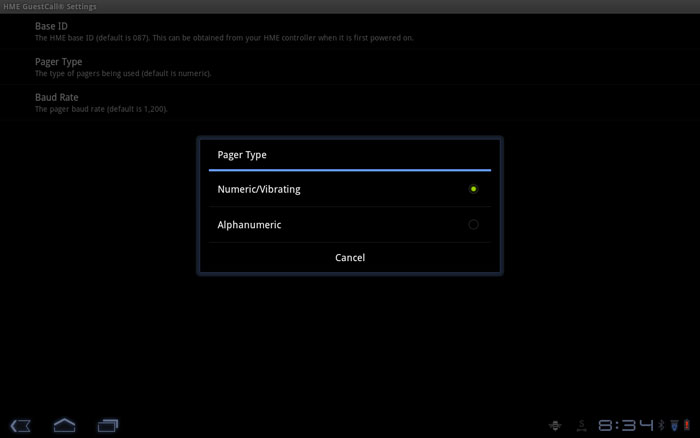
4a. The “Pager Type” preference is used to indicate the type of pagers you use with your paging system. The default is “Numeric/Vibrating” which includes pagers without displays and with numeric-only displays. If your pagers have an alphanumeric display and you wish to send a text message when paging guests, change the pager type by tapping the “Pager Type” item as shown below:
4b. Then tap the appropriate pager type as shown below. The message sent to alphanumeric pagers is the one set in step 4 of the “Configuring Servus” section above.
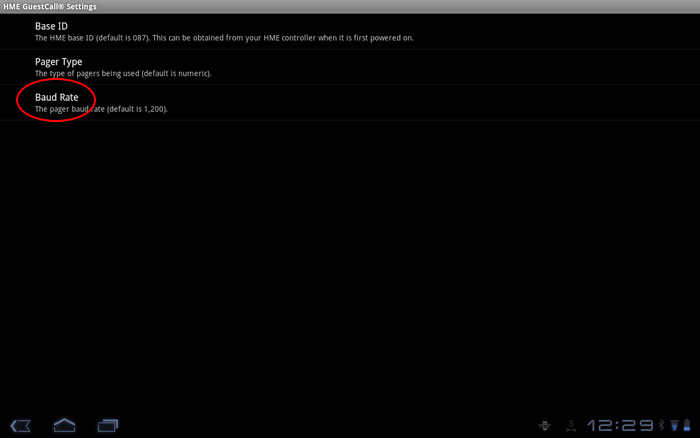
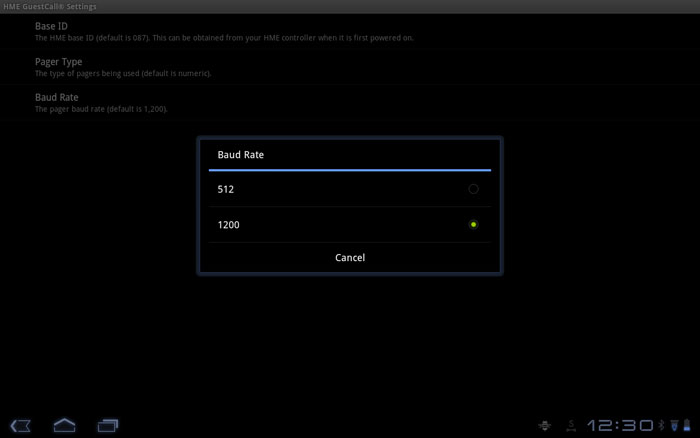
5a. The pager baud rate defaults to 1200. This should be fine for most installations. If, however, you are instructed by HME to change it, you can do so by tapping the “Baud Rate” item as shown below.
5b. Then tap the appropriate baud rate as shown below:
JTECH GuestAlert
If you are using a JTECH GuestAlert system, you will need to enter the CAP Code provided to you by JTECH.
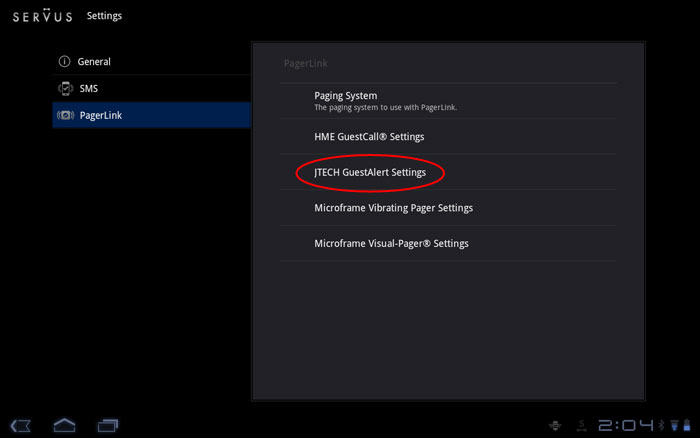
1. Tap the “JTECH GuestAlert Settings” item as shown below.
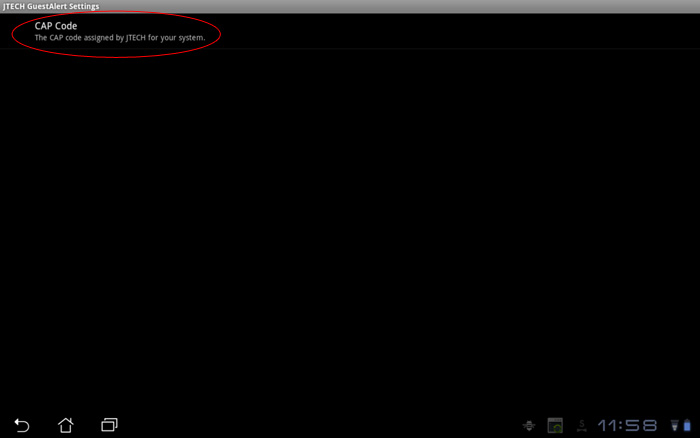
2. Tap the “CAP Code” item that appears as shown below.
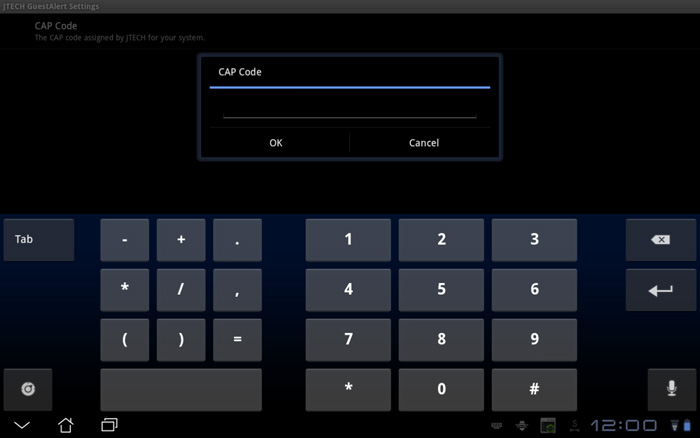
3. Enter your CAP Code into the dialog that appears and then tap the “OK” button as shown below.
Microframe Vibrating Pager
The Microframe Vibrating Pager system has three configurable settings, the latter two of which will be provided to you by Microframe Corporation:
- Alert Mode (default is Flash & Vibrate)
- Base Number (default is 500,000)
- Baud Rate (default is 1,200)
Note: If your values match the defaults above, there is nothing to configure and you can skip to the Conclusion section at the bottom of the page. If you do need to change any of the above, follow the below steps.
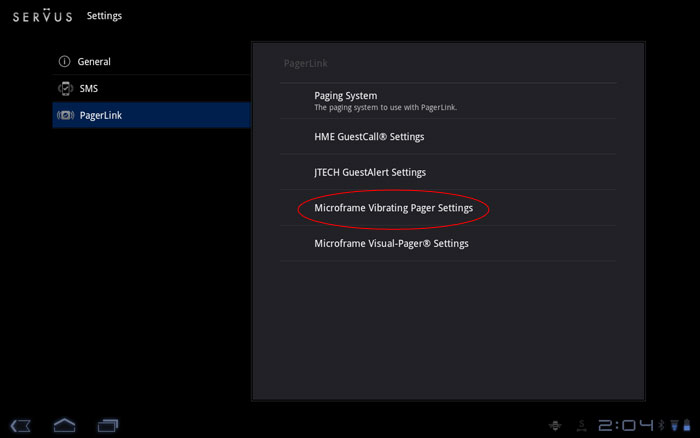
1. Tap the “Microframe Vibrating Pager Settings” item as shown below.
2a. If you need to change the Alert Mode, tap the “Alert Mode” item as shown below.
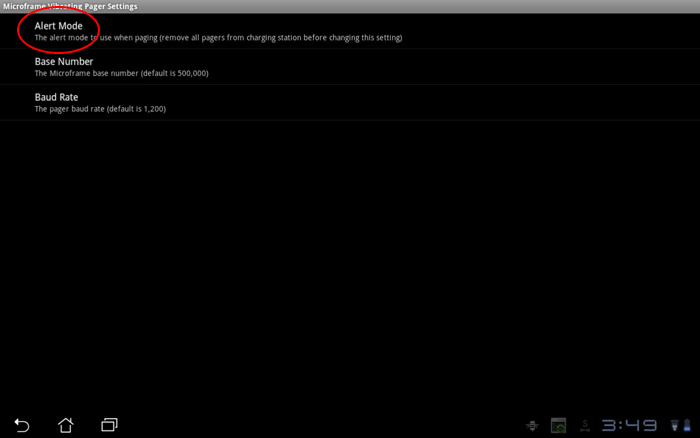
2b. Remove all pagers from the charging station and tap the Alert Mode setting you wish to use as shown below. Note: pagers in the charging station will not have the new alert mode applied!

3a. If you need to change the Base Number, tap the “Base Number” item as shown below.
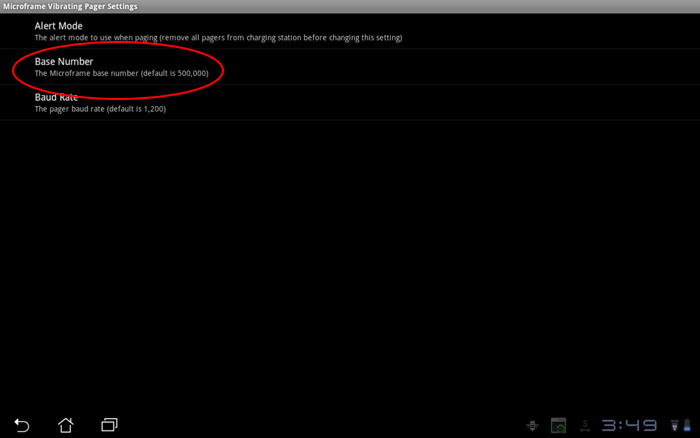
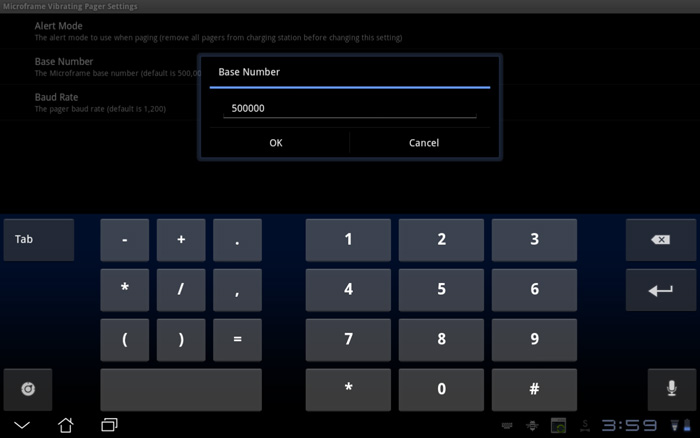
3b. Enter the Base Number into the dialog that appears and tap the “OK” button as shown below.
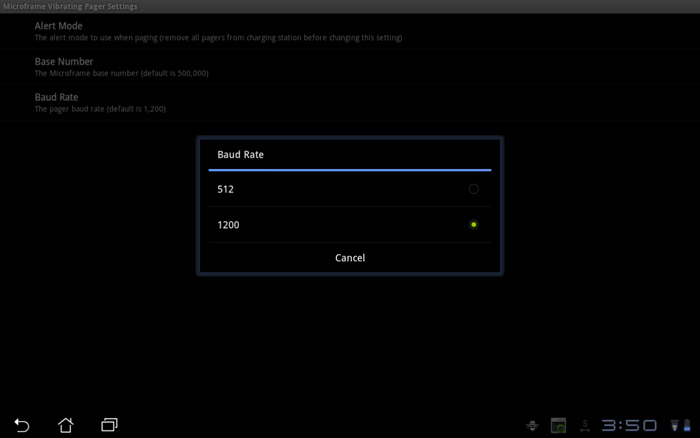
4a. If you need to change the Baud Rate, tap the “Baud Rate” item as shown below.

4b. Tap the Baud Rate in the dialog that appears as shown below.
Microframe Visual-Pager®
The Microframe Visual-Pager® system has four configurable settings, the latter three of which will be provided to you by Microframe Corporation:
- Auto Delete Time (default is 2 minutes)
- Frame Pager ID (default is 1,500)
- Base Number (default is 500,000)
- Baud Rate (default is 1,200)
Note: If your values match the defaults, there is nothing to configure and you can skip to the Conclusion section at the bottom of the page. If you need to change any of the above, follow the below steps.
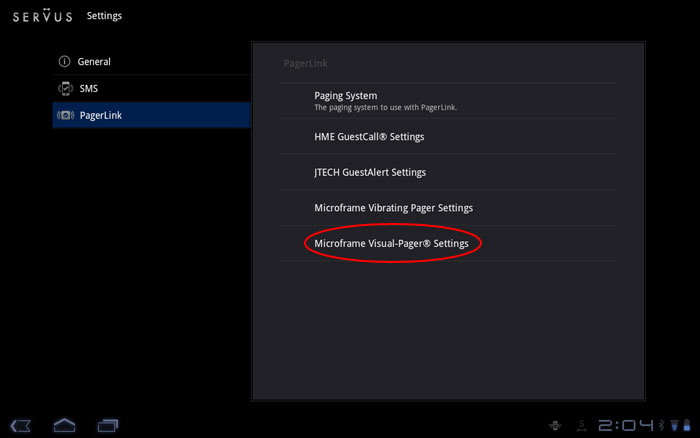
1. Tap the “Microframe Visual-Pager® Settings” item as shown below.
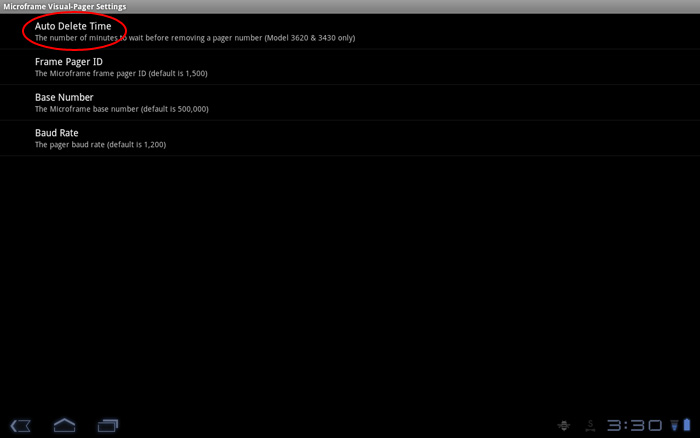
2a. If you need to change the Auto Delete Time, tap the “Auto Delete Time” item as shown below.
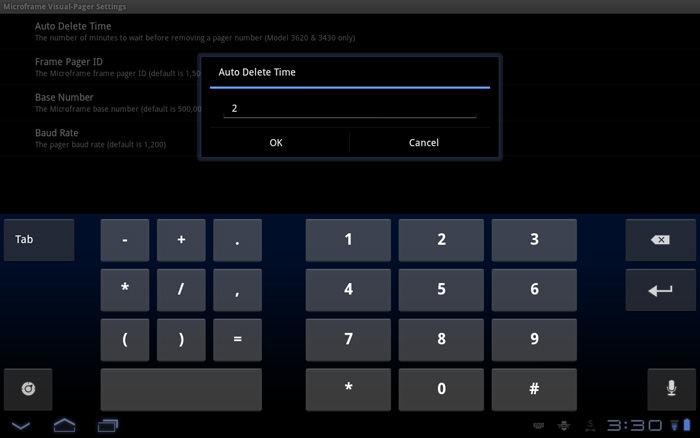
2b. Enter the desired Auto Delete Time (in minutes) into the dialog that appears and then tap the “OK” button as shown below. Note: all your Microframe displays must be powered on to receive the change and it only works on Model 3620 & 3430 displays.
3a. If you need to change the Frame Pager ID, tap the “Frame Pager ID” item as shown below.

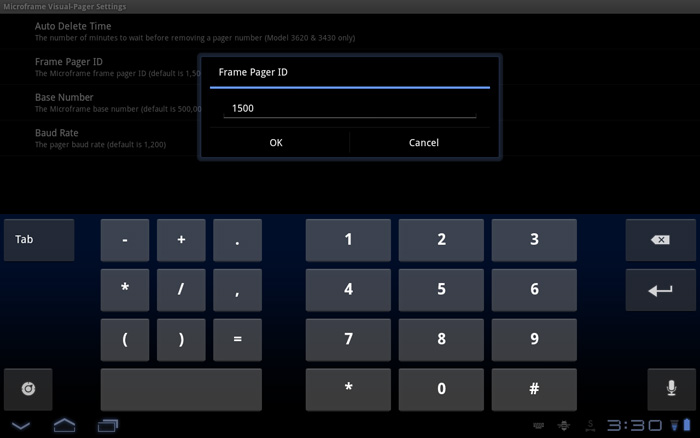
3b. Enter your Frame Pager ID into the dialog that appears and then tap the “OK” button as shown below.
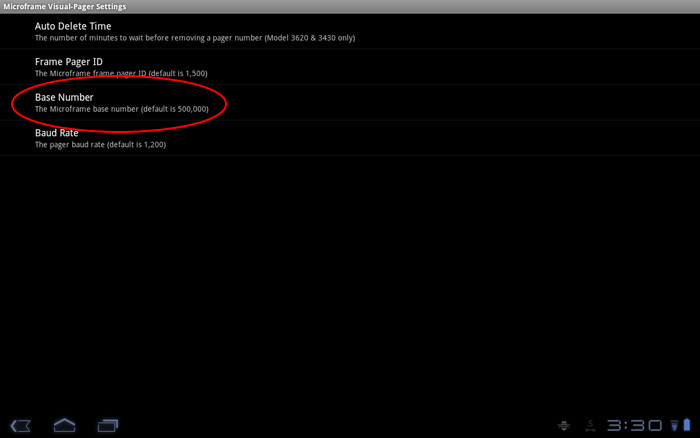
4a. If you need to change the Base Number, tap the “Base Number” item as shown below.
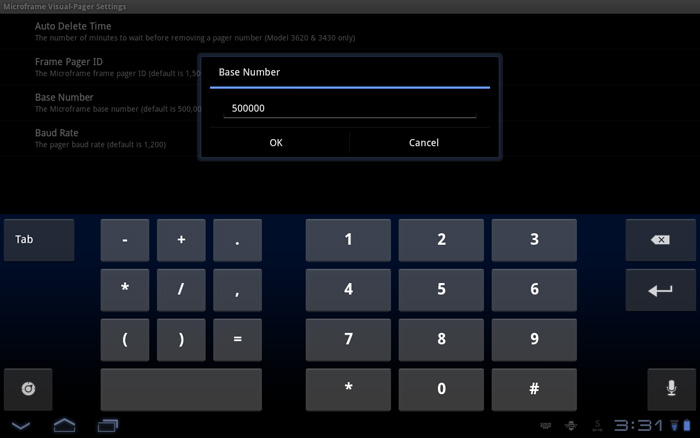
4b. Enter your Base Number into the dialog that appears and then tap the “OK” button as shown below.
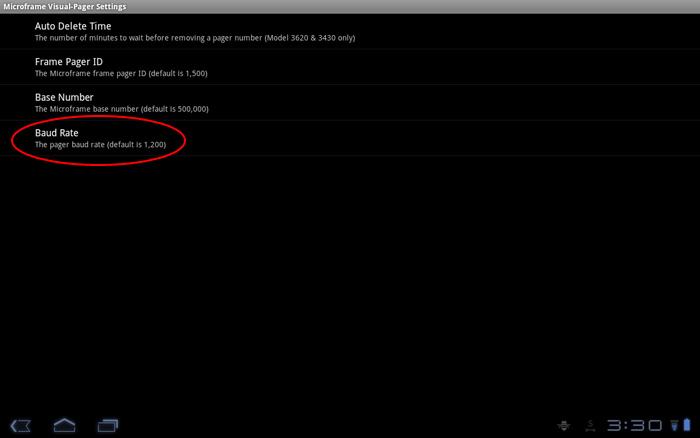
5a. If you need to change the Baud Rate, tap the “Baud Rate” item as shown below.
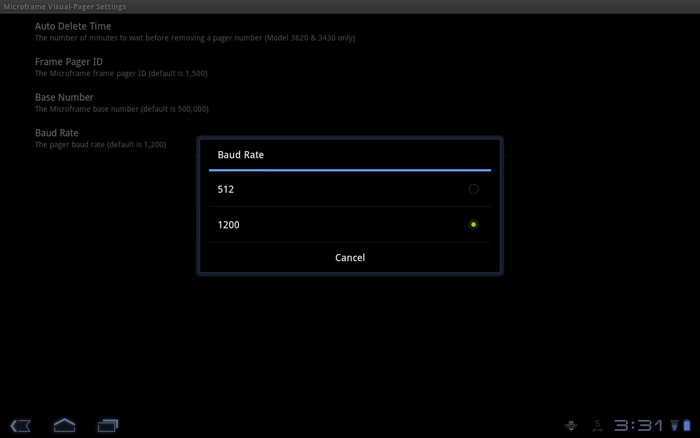
5b. Tap the Baud Rate in the dialog that appears as shown below.
Conclusion
Tap the “Back” button in the bottom-left corner of the screen until you are returned to the main Servus application. Your device is now configured to automatically send guest pages to your pager system when the PagerLink device is connected.
