BlueSMiRF Silver Bluetooth modem and Mac OS X
For creating a prototype for a wireless Servus PagerLink device, I decided to use an Arduino Uno and Sparkfun's BlueSMiRF Silver bluetooth modem. The process of setting everything up was reasonably painless but there are still a few issues I need to work out.
Powering up the BlueSMiRF Silver
As you can see from the product link above, the BlueSMiRF Silver comes with six solder holes rather than pins. So, the first order of business was to solder a 6-pin header to the board for prototyping purposes.
The next step is to provide power to the BlueSMiRF. The current version of the board can take 3.3V-6V so you can use either the 3.3V or 5V power pins on the Arduino. Simply connect the power and ground from the Arduino to the VCC and GND pins on the BlueSMiRF like so:
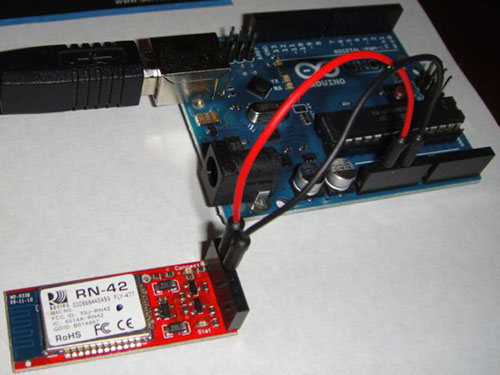
When you plug in the Arduino, the BlueSMiRF's red LED will begin blinking. You are now ready to pair it with the Mac.
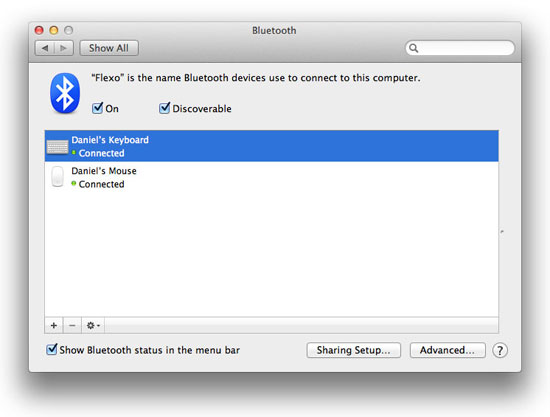
Pairing the BlueSMiRF Silver to the Mac
You're obviously going to need a Mac with Bluetooth capability to do a pairing. This is done using the Bluetooth Setup Assistant which you can access from the Bluetooth system preference:
Click the '+' button in the bottom-left to start the assistant. Once the assistant starts, it will begin searching for discoverable Bluetooth devices. It should find the BlueSMiRF fairly quickly:
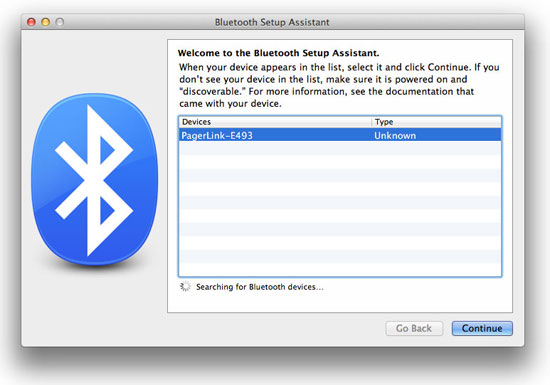
Note: I've cheated and changed the device name of my BlueSMiRF to "PagerLink." The out-of-the-box name it had was something way more generic like EC4291-E493. The Roving Networks RN-42 documentation (which is the Bluetooth modem the BlueSMiRF uses) claims the default device name will begin with "Firefly" but that was not the case with mine.
At any rate, with the BlueSMiRF device highlighted, click the Continue button and voila! The pairing fails:
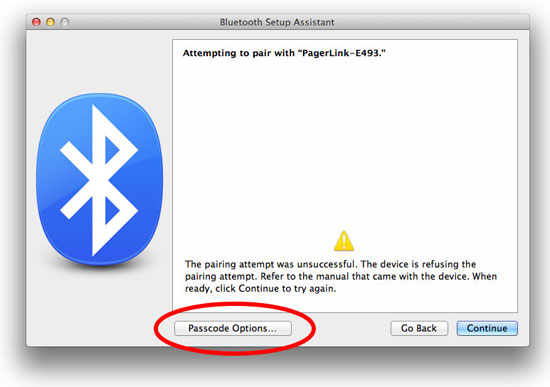
Click the "Passcode Options" button:
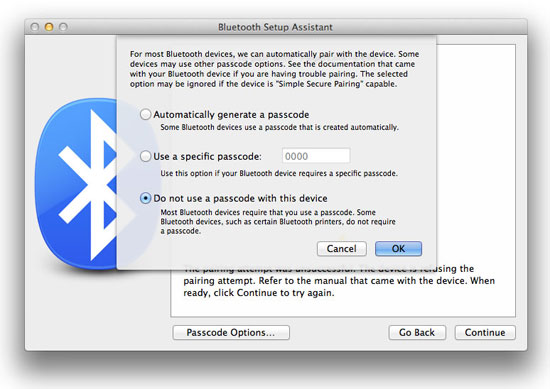
Then click the "Do not use a passcode with this device." You can also choose the "Use a specific passcode" button and give it a passcode of 1234. Either way, click the OK button. The BlueSMiRF will then be interrogated for few seconds:

Here is where things get strange. I've seen two things happen at this stage: either the Bluetooth serial port is created successfully and all is well or you get this:
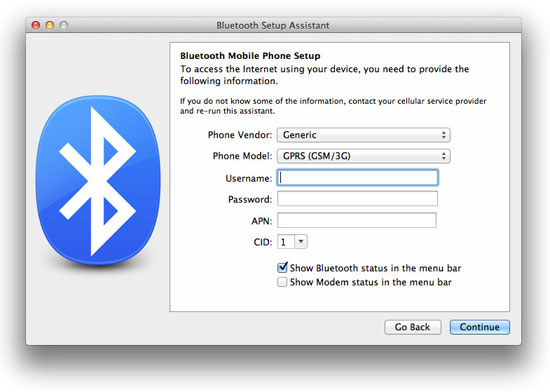
This appears to be a situation where the Bluetooth Setup Assistant thinks the BlueSMiRF is a mobile phone. If you click the Continue button here, you'll wind up with a Bluetooth PAN network adapter and no serial port to speak of.
So, if the assistant successfully sets up a serial port, jump ahead to the Connecting to the BlueSMiRF section below. The rest of us will have to force the creation of the Bluetooth serial port.
Forcing Bluetooth serial port creation
Let me preface this by saying there is probably a better way to do this. Unfortunately, this is the only way I've found to make this happen and it took some trial-and-error to figure it out.
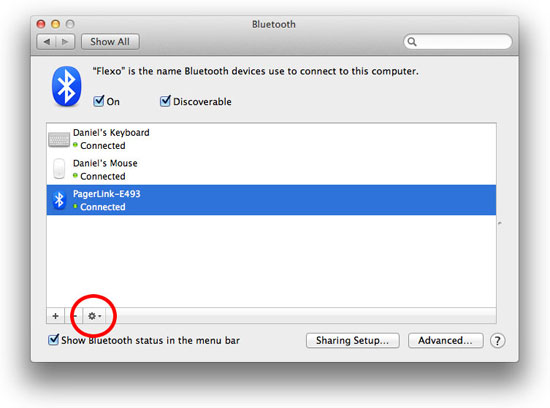
Remember this screen:
I'm going to refer to this as the Bluetooth system preference dialog. This is a list of the current Bluetooth devices. Ideally, we want to see our BlueSMiRF in this list. If a Bluetooth serial port is created for the BlueSMiRF, it will show up here. If only a Bluetooth PAN is created, it will not.
If you're not in the Bluetooth Setup Assistant anymore, re-run it. If you are, just click the "Go Back" button a few times until you get to the first dialog again. This time, make sure that the Bluetooth system preference dialog is accessible while you run through the assistant.
Run through the assistant the same as before. However, when you get to this screen:
Quickly (you'll only have a couple of seconds), jump over to the Bluetooth system preference dialog. You'll see the BlueSMiRF in the list as its being interrogated. Make sure it's highlighted and then click the "Perform tasks with the selected device" button as shown below:
A small menu will appear. Click the "Edit Serial Ports..." button. This will bring up the following dialog:
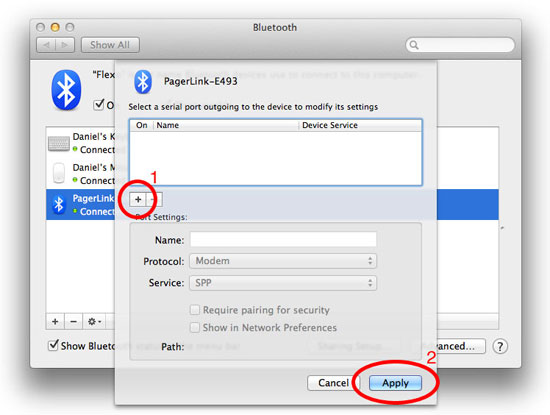
Click the "+" button (1) and then the "Apply" button (2). This will force the creation of a Bluetooth serial port. You can now complete the Bluetooth Setup Assistant normally. When it's complete, you should still see the BlueSMiRF listed in the Bluetooth system preference dialog with a status of "Not Connected."
Connecting to the BlueSMiRF
You should be able to use any terminal program (or even the command-line screen command) to connect to the BlueSMiRF Silver. My program of choice is the free CoolTerm so that's what I'll demonstrate with.
Running CoolTerm will bring up a "CoolTerm_0" window. In the "Connection" menu, click "Options..." which will bring up the following dialog:
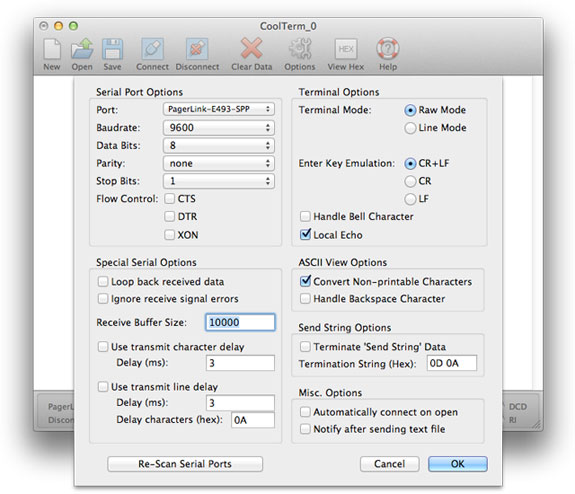
Make sure your settings look similar to mine above (note the Local Echo checkbox is on). You should change the "Port:" setting to your BlueSMiRF's serial port. Then click the "OK" button.
In the CoolTerm_0 window, click the "Connect" toolbar icon. Here is where things get strange again. Sometimes, CoolTerm can connect to the BlueSMiRF immediately. Other times, the connection is refused. If that happens, try again a few times and it will eventually connect. I haven't determined if this is a problem with the BlueSMiRF or with CoolTerm itself. A successful connection will show this in the bottom-right corner of the window:

BlueSMiRF command mode
For the first 60 seconds after the BlueSMiRF is powered up, sending $$$ to it will put it in command mode. This allows you to change the device's various settings. The full command set is available in the RN-42 documentation. For purposes of this example, we'll simply have the BlueSMiRF tell us its current settings.
Chances are your BlueSMiRF has now been powered on for more than 60 seconds. If CoolTerm is still connected to it, click the "Disconnect" toolbar icon. Then disconnect the power from the BlueSMiRF for a few seconds and reconnect it. Click the "Connect" toolbar icon in CoolTerm until you are successfully connected.
In the CoolTerm window, type:
$$$
The BlueSMiRF should respond with:
CMD
You are now in command mode. To see the current settings, type:
DE
followed by the Return/Enter key. The BlueSMiRF will respond with:
***Settings***
BTA=xxxxxxxxxxxx
BTName=PagerLink-E493
Baudrt=9600
Parity=None
Mode  =Slav
Authen=0
Encryp=0
PinCode=1234
Bonded=0
Rem=NONE SET
Your settings will most likely be slightly different than mine above.
And that's it... you can now successfully connect and configure your BlueSMiRF in Mac OS X.