Enhancing an AirGradient air quality sensor including VOC & MQTT
December 6th, 2021
Introduction
A few years ago, my wife and I learned the hard way about the health issues that can arise from air quality problems. The apartment we rented after moving to Germany had been an old bakery converted into a very modern looking, two-level apartment. But as it turned out, the incredibly narrow, slippery, all-metal, spiral staircase of death was not the only hazard to be found in our new home. We soon learned that during its remodel, the landlord chose not to install an air circulation system but did choose to install extremely efficient windows. I have been told that the resulting problems can often be found with cost-cutting German remodels because such older buildings need to "breathe" and were not designed to have well-sealed windows. Fortunately, our many months of health issues all but disappeared within weeks after moving out, but the experience led us to be much more cognizant of indoor air quality than we had been in the past.
Becoming Awair
I was quite happy with our new, one-level, air recirculator-enabled apartment and the 1st generation Awair device I had chosen to monitor its carbon dioxide, volatile organic compounts (VOC) and particulate matter (PM2.5) levels. I wrote a small program that downloaded the Awair sensor data via their API and, with the help of Node-RED and some custom Golang code, could alert us through our Google Home speaker when we needed to ventilate. The requirement of having to obtain the Awair sensor data through their rate-limited cloud API rather than simply polling the device on the local network was a bit disappointing but workable and we ran this way for many months. I even added a 2nd generation Awair Element to monitor levels in the other half of the apartment.
On a side note, during that time I also tried a uHoo device but was extremely disappointed by its flaky setup, price/performance ratio and the fact that its data was inaccessible to me other than through their slow-to-refresh mobile application. I would not recommend it to anyone.
At any rate, no good thing lasts forever. Our 1st generation Awair device recently started having a problem with its PM2.5 sensor remaining pegged at its highest level (as you can see in the photo). Apparently, others have also encountered this problem. This obviously makes the air quality score rather unhelpful. Multiple attempts at cleaning things out with compressed air, leaving it off for a few days, etc. didn't resolve the situation so I began researching the current state of the air quality sensor landscape to determine my options.
Enter AirGradient
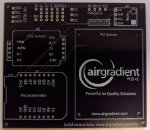
I soon came across the AirGradient DIY project and really liked the idea of having a local, open source device that could do almost everything (I'm looking at you VOC) the Awair could. And if a sensor failed, I could simply replace a single sensor rather than the whole device. The cost of the PCB and all sensors was far less than a new Awair, so I decided to give it a try. I had a batch of PCBs printed (5 was the minimum) and ordered enough hardware from AliExpress to build a single device for testing.
Shortly after I received everything, I eagerly (and fortunately successfully) built the device according to the AirGradient instructions. After flashing their provided firmware, I ran it for a few days right next to the 2nd generation Awair. The sensor readings, although not identical, were close enough that I was quite pleased with the device. In fact, I found there were really only 3 things I didn't like about it:
- As mentioned already, VOC measurements were not supported.
- The fan and laser-based PM2.5 sensor it uses would theoretically only last about a year running 24/7. It turns out the sensor has a pin that could be used to sleep/wake it. Thus, it seemed unnecessary to run it continuously when measurements only really needed to be sampled periodically.
- If Wi-Fi was enabled, the device could only send JSON data to an AirGradient cloud-based endpoint. Well, to be fair, one can change the endpoint it uses but it would require some custom work to ingest and do useful things with the data. It seemed like open standard like MQTT would offer more flexibility and interoperability.
A couple of research hours later, I had found and read through the ESPHome project's documentation. It looked like this would allow me to significantly and easily improve the AirGradient device capabilities.
Flashing the ESPHome software
The first order of business was to flash the device with an ESPHome configuration supporting all the sensors that were already on the AirGradient device. Fortunately, I found a blog post from Ben Congdon that had instructions for just this task. I installed the ESPHome software following the directions on their website and was soon able to flash the device and confirm that it worked perfectly!
Enabling MQTT support
ESPHome has built-in MQTT support, which as I mentioned above, seemed like a much better approach to getting sensor data off the device. I even stumbled upon a proposal for mapping sensor data to MQTT topics that appeared to be used by a number of other projects. So, rather than reinventing the wheel (and much to the chagrin of the little "developer devil" on my shoulder telling me I could concoct something even better), I took this approach with my MQTT configuration as well.
Extending PM2.5 sensor life
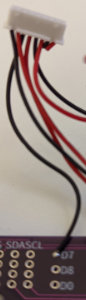
Up to this point, all my tweaking had been in software and required no modifications to the hardware of the AirGradient device. But as it turns out, the AirGradient instructions do not have you connect the PM2.5 sensor pin that allows for sleep/wake. In fact, if you completely follow the instructions as I did, it has you cut the needed wire altogether. Fortunately, the cable that comes with the sensor has the same connector at both ends and I was able to use the previously unneeded other half of the cable to recover from this challenge.
The AirGradient PCB conveniently provides a number of unused breakout points for digital pins on the ESP device. I arbitrarily chose D7 as the one for the sleep/wake function. I modified the ESPHome configuration with a timer that sleeps for 2 minutes, switches the sensor on, waits 30 seconds for it to stabilize as per the manufacturer's recommendations, takes readings for 5 seconds and then shuts it off again. This should extend the life of the sensor from about a year to several years (back of the napkin math indicated 16 or so but I find that a bit hard to believe and am not curious enough to venture further into the math to come up with something more accurate). By the time the sensor dies, there will likely be a new, way more interesting replacement sensor to fiddle with anyway.
Enabling VOC support
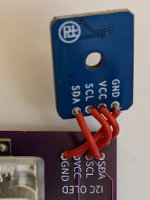
The AirGradient PCB also conveniently offers an unused point to attach an I2C device (it's labeled "I2C OLED"). Since ESPHome supports the SGP40 VOC I2C sensor, in theory it should be very straightforward to add to the board and enable in the firmware. I ordered this one from AliExpress and hoped that I hadn't just wasted money due to some carelessly overlooked technical detail.
Upon receiving the sensor, the only challenge I ran into was that, when the sensor board's chip was facing upwards, the pin ordering on the breakout board was opposite the pin ordering on the AirGradient PCB. Now, I am not sure if having the chip facing downwards towards the PCB would skew its readings, but I didn't want to take any chances. So rather than connecting the sensor neatly with the it's included 4-pin connector, I connected it with some loose wire I had to allow the chip to face upwards away from the PCB. You can see how the wires are reversing the pin order in the photo. Despite this little hiccup, the sensor works great!
The primary difference I see so far is that the Awair measures in parts-per-billion (ppb) and the SGP40 uses its own "air quality index" measurement. This doesn't bother me since I'm less concerned about an absolute value but rather when the VOC level becomes something to be concerned about. It is also possible that the Awair's sensor can pick up chemicals that the SGP40 can't. I will need to do further testing on this front.
Making the screen more user-friendly
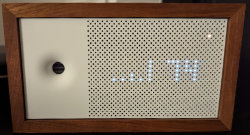
I updated the OLED screen code to include the new VOC value and put everything on a single page rather than alternating between two pages. I also made the screen turn off every few seconds to extend its life. What quickly became apparent, however, is that a bunch of numeric measurements does not create the best user experience. Was a VOC level of 10 good or bad? Should I ventilate when CO2 reaches 1000 or 1200?
So, I rewrote the screen rendering script to display adjectives like "GOOD", "WARN", "BAD", "OMG", etc. for each sensor based on the current value. The actual numeric measurements are still send via MQTT for use in automation scripts, etc. I might consider calculating some sort of overall "air quality score" in the future but I'm content with this approach for now.
Conclusion
Overall, this has been quite a fun project and I'm hopeful the new device will last a good while. I still need to 3D print a case for it but that is a whole other can of worms. Anyway, I hope this proves helpful to others. You can find the ESPHome configuration in my GitHub repository. Have fun and stay healthy!